|
|
Programming the FMC
iFMS simulates the workings of a typical “Boeing style” FMS.
In particular, iFMS was actually based on the system commonly found in the older Boeing 747/757/767 series, but the system is very similar across all Boeing aircraft.
Below is a small a tutorial to take you through programming the FMC and flying the programmed route.
For this tutorial we will fly from KLAS (Las Vegas) to KSJC (San Jose) via Jet rout J110.
The filed flight plan will look something like this: KLAS FUZZY J110 SNS KSJC.
For this example we’re flying a 737-800, the 737-800-LBS.AC files was selected in iFMS and the standard 737-800 in FSX was loaded, but you can of course fly this tutorial using any aircraft of your choice, you just need to enter the correct weights etc. and make sure the cruising altitude is achievable for your aircraft.
|
PERF INIT
So we’ll start the tutorial assuming the aircraft is in its parking position and the flight plan has been filed.
At this point in time normally you would not have received your SID/RWY information yet, you will only receive this shortly (up to 1 hour) before pushback when requesting clearance but that does not stop you from programming the route already.
ATC knows your first intended waypoint is “FUZZY” so when they clear you they will obviously give you a SID that will send you in that direction.
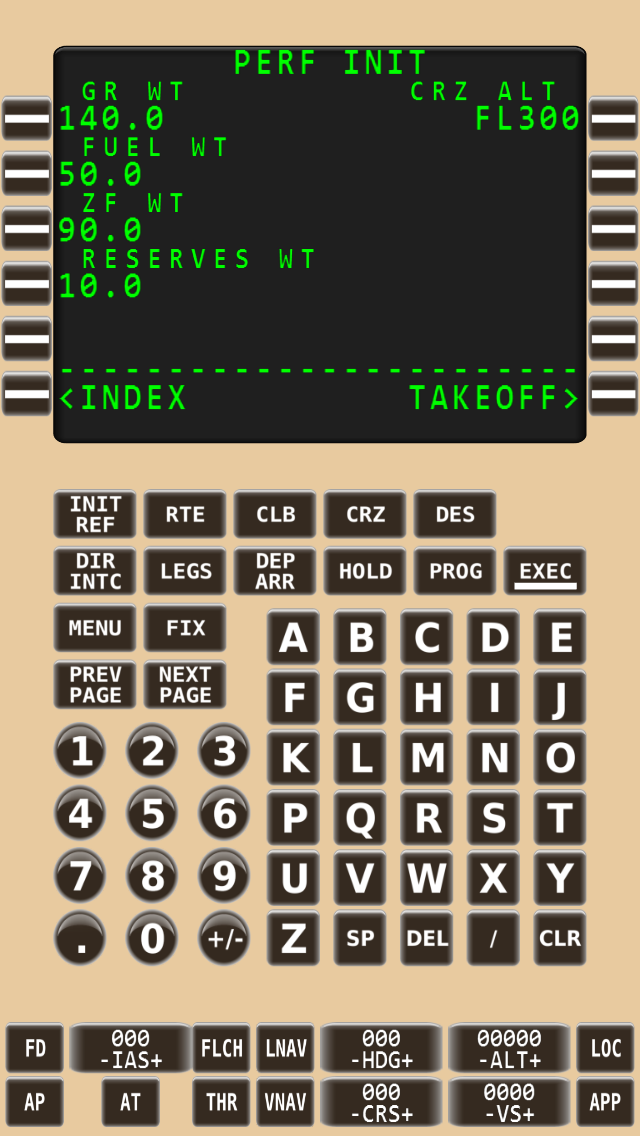
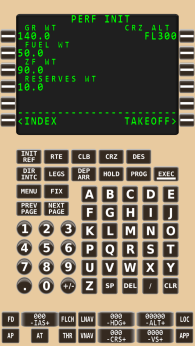
First we’ll complete our “PERF INIT” page, you can navigate to this page using the “INIT REF” button. This button can take you to a number of related pages (using the <INDEX function you can see them all), but normally it will take you to the next page that is required to be completed.
For the 738, we will enter the following numbers, of course this depends on how much fuel and payload you are taking with you, let’s assume we’ve got an aircraft weighing 90,000lbs and 50,000lbs of fuel on board, so we enter “90” in the “ZF WT” field and “50” in the “FUEL WT” field. If your aircraft is configured using metric the metric system, you should enter metric (tons) values here off course. For fuel reserve we’ll choose 10,000lbs so we enter “10” in the “RESERVES WT” field.
Now all we need to do is enter our cruising altitude, this is not a very long flight so we won’t be cruising very high, let’s assume we’ve filed a cruising altitude of FL300, so enter “300” in the “CRZ ALT” field. You can also enter this value in feet, i.e. “30000” the FMC will know you mean FL300 as this is above our transition altitude anyway.
At this point all fields in the PERF INIT page have been completed, the light on the EXEC button will now light up, press it to execute the current PERF INIT page.
|
PERF INIT
|
RTE page 1

RTE page 2
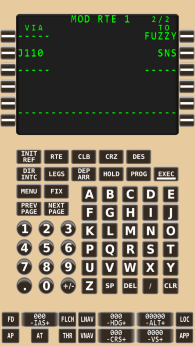
LEGS
|
Programming the Route
Now let’s program the route, you can also program the route first and do the PERF INIT programming afterwards, it generally does not matter.
Click the “RTE” button and enter your origin (KLAS) and destination (KSJC), then click ACTIVATE.
Once this is done you should be able to click “NEXT PAGE”, you are now in the main page that allows you to program your waypoints, airways etc.
Waypoints are entered on the right, airways are entered on the left, so here we go.
Type “FUZZY” in the scratchpad and press RSK1 (the keys next to the screen are commonly known as LSK1 to LSK6 on the left and RSK1 to RSK6 on the right side of the screen, the bottom part of the screen where the text you type appears is called the scratchpad). You should now see “DCT FUZZY” on the first line of your route.
Now that we’re on a waypoint that’s part of the J110 airway, we can continue to follow the airway.
So now type “J110” in the scratch pad and press LSK2, you should now see “J110” appear on the left side of the screen and 5 empty boxes on the right side of the screen indicating you need to tell the FMC till what point you would like to follow this airway.
As per our filed flightplan, we’re follong the J110 airway to waypoint SNS, so now type “SNS” in the scratchpad and click RSK2, you have now programmed your route.
You can now exec the route if you want, this will allow you to see progress info etc., but it is not required yet at this stage.
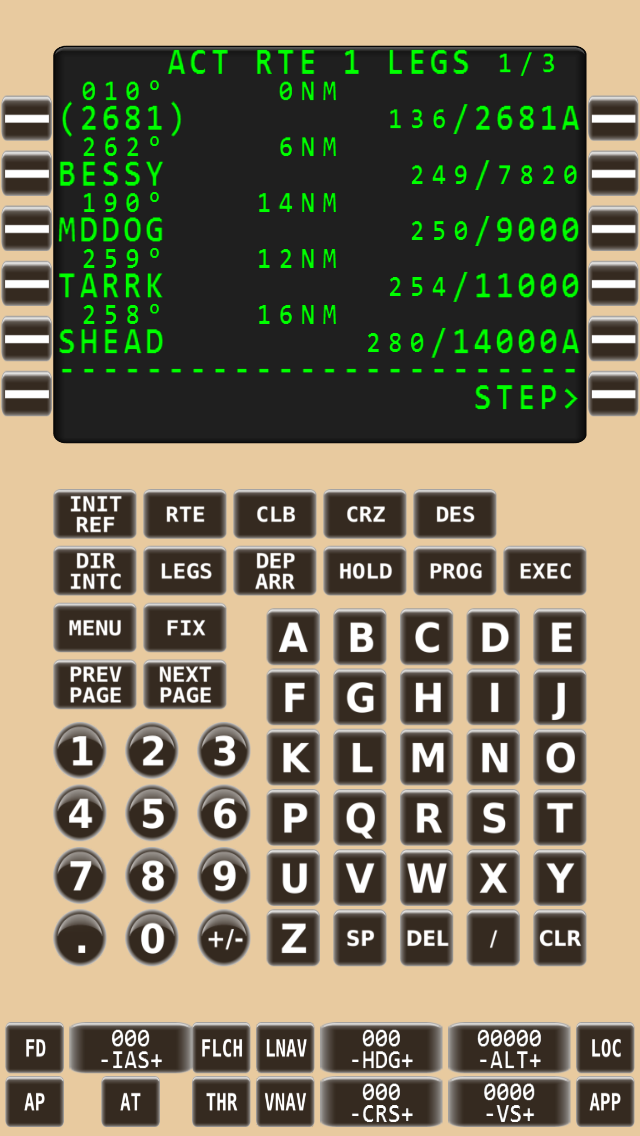
If you now click the LEGS button, you will be able to see all the waypoints you will be flying, you could have entered then one by one in this page as well but obviously it is much easier to use the airway functionality in the route pages.
|
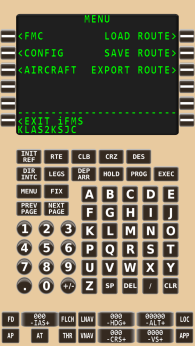
Saving your Route
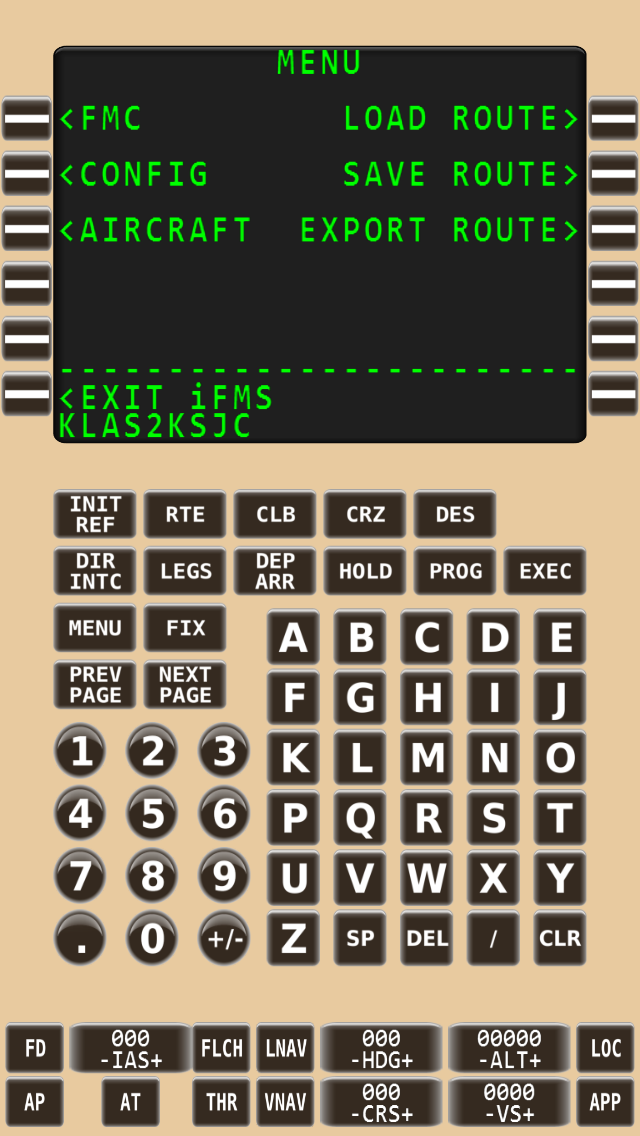
At this stage you might want to save this route if you’d like to re-use it at a later time.
To do this click on the MENU button, type a meaningful name in the scratchpad like “KLAS2KSJC” and click on the RSK next to “SAVE ROUTE>”.
If you click “LOAD ROUTE>” after that your route should be in the list and can be loaded by clicking the LSK next to it (don’t at this time since you’ve already got it in the FMC and re-loading will undo some calculations already done).
|
SAVE ROUTE
|
|
|
Departure RWY and SID programming
We’re now ready to request our clearance, as mentioned before ATC knows our the first waypoint on our route and will give us a SID that leads us roughly in that direction.
Looking at KLAS it would seem that the only option would be one of the SHEAD SIDs, (even SHEAD SIDs take you around a bit but it seems like these are only SIDs going west).
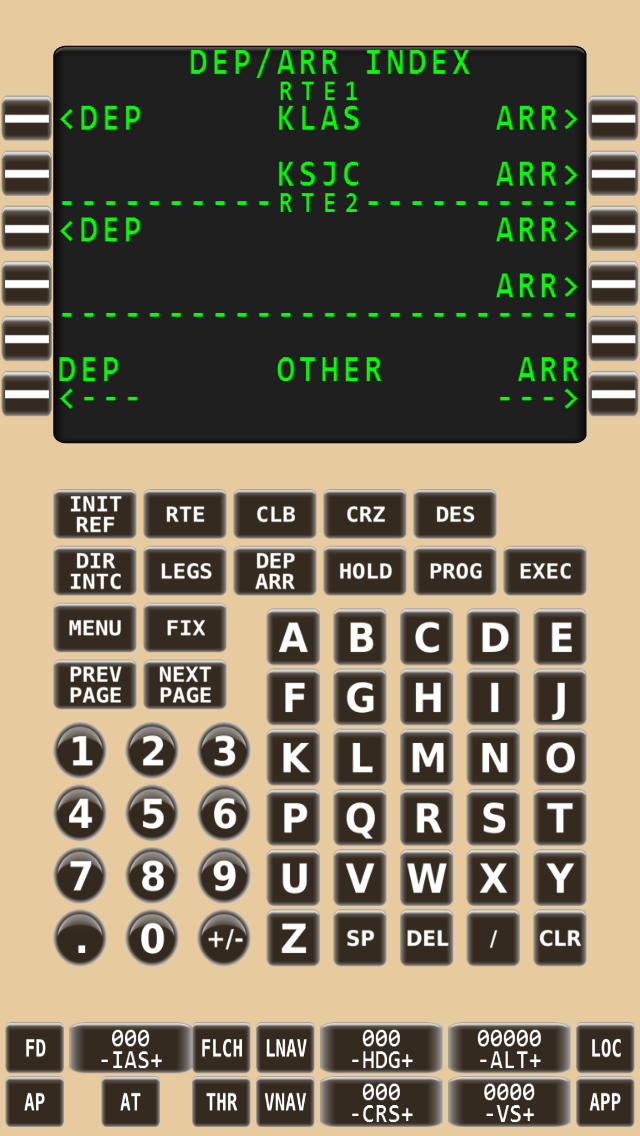
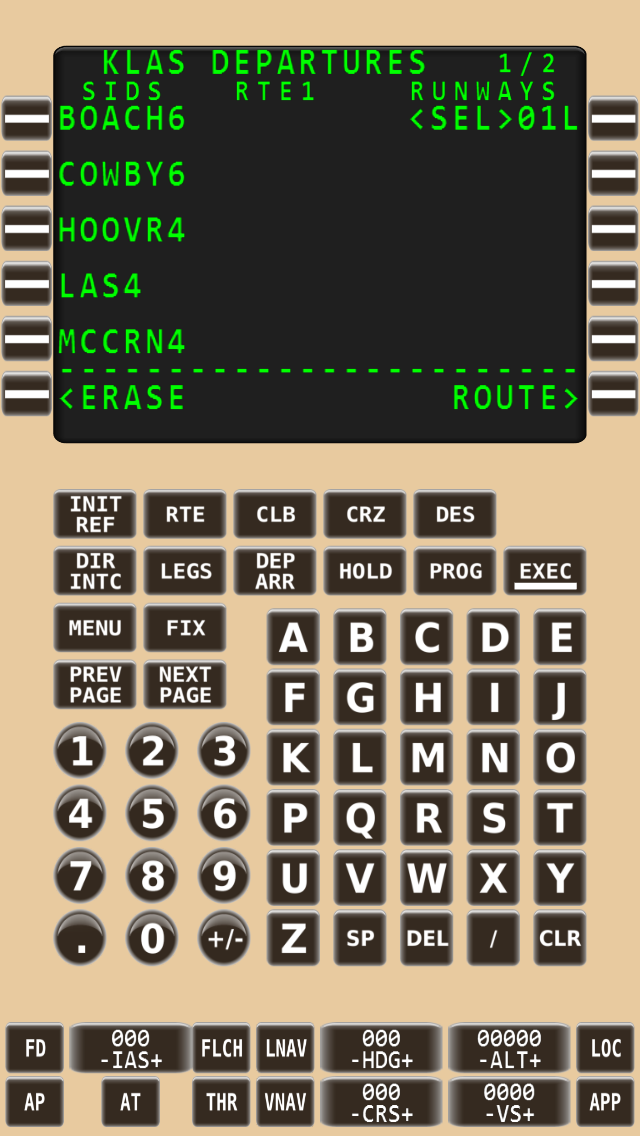
Anyway, let’s assume we’ve received RWY 01L and SHEAD7, so in the departures page we need to select these, so click on the “DEP ARR” button, then press LSK1 next to “<DEP”, click the RSK next to 01L (you might have to use the “PREV PAGE” / “NEXT PAGE” button to scroll down to get your runway on the screen.
Once you’ve selected 01L, only SIDs for that runway will be displayed on the left side of the screen, press the LSK next to SHEAD7 (again, you might have to use the “PREV PAGE” / “NEXT PAGE” button to scroll down to your SID). You can now select an SID transition as well, but in this case we won’t use one.
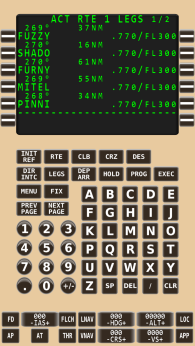
Once this is done we can go back to the LEGS page and examine the route this has programmed for us. It might be we want to make some changes here.
Once we’re happy with the route we can execute it by pressing the “EXEC” button, the EXEC light should then disappear and a VNAV plan should be calculated, which means you should see altitudes and speeds next to every waypoint.
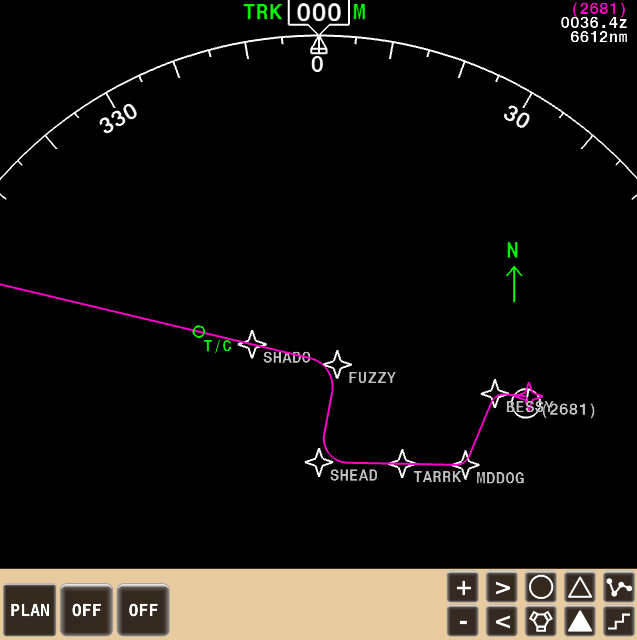
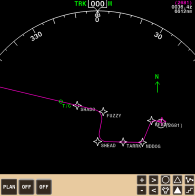
If you go to your PLAN mode on the NAV display you can actually examine the route visually and step through it using the STEP button either on the FMC or the little staircase button on the NAV display.
|
Examining the Route in the NAV display
If you go to your PLAN mode on the NAV display you can actually examine the route visually and step through it using the STEP button either on the FMC or the little staircase button on the NAV display.
|
Nav Display - PLAN Mode
|
TAKEOFF REF
|
Lets go Flying
We’re done programming the FMC for at this stage and we’re now ready for pushback & start-up.
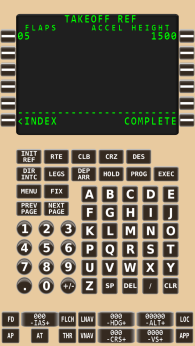
On our way to the runway the final thing we need to do is enter take-off info so press “INIT REF”.
Notice that this time the PERF INIT button takes you straight to the “TAKEOFF REF” page where before it took us to the “PERF INIT” page. This is because the PERF INIT has already been completed and the TAKEOFF REF is the next page to be programmed.
All we need to do here now is enter the take-off flap setting we will be using, let’s assume this will be 5 degrees, so enter “5” in the “FLAPS” field. You should now see the word “COMPLETE” on the bottom right of your screen indicating that your aircraft is ready for departure.
So let’s go flying.
Taxi to our runway 01L and turn on “LNAV” and “VNAV” using the buttons on the bottom of the FMC screen, also turn on the flight director using the “FD” button if it is not on already.
Don’t turn on the master autopilot (“AP”) or auto throttle (“AT”) just yet.
Let’s take off manually first, once airborne the AP and AT are engaged.
Now we can relax and let the aircraft fly the route. For this tutorial we’ll assume we don’t get any flight plan changes from ATC and we just fly the route as filed from here on.
|
Arrival and Approach
When approaching your destination you’ll be required to program your STAR.
As with the SID, you don’t receive the STAR and arrival runway information from ATC until well into the flight because this really depends on a number of factors such as active runway, congestion, time of day etc.
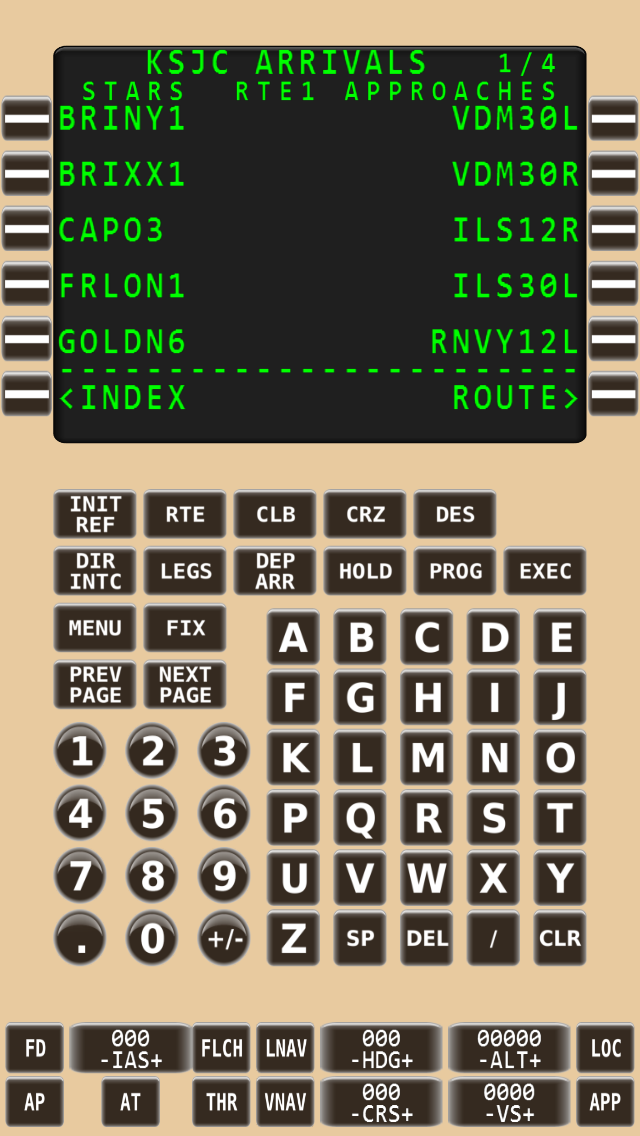
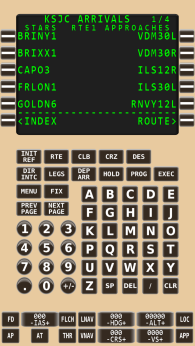
You will probably receive your STAR and runway information an hour or so before reaching your destination. The flight plan we’ve filed had SWL as our last waypoint so ATC will provide us with a STAR coming from that direction. The procedure here is the same as what we did with the SID above, just press the “DEP ARR” button, then press RSK2 next to “KSJC ARR>”, don’t press RSK1 of course, this is only used if you were returning to your origin for some reason.
You will also need to complete the “APPROACH REF” page before landing, which is similar to the “TAKEOFF REF” page. Again, just use the “INIT REF” button, it should now take you to the “APPROACH REF” page.
|
ARR
|
BRG/DIST

Coordinate String

|
General FMC Programming tips
One thing to note is that sometimes the STAR (or SID) you receive overlaps with part of your route. When this happens what you do is just enter the STAR but you then need to fix the overlap in the legs page.
Say for example your last waypoints in the route were a, b, c. Now you receive a star that contains waypoints b, c, d, e, f, g. When you enter this star and go to your legs pages you will see your route is a, b, c, b, c, d, e, f, g. The STAR was just added to the back of the already existing route but this is obviously wrong because after over-flying waypoint c it takes you back to b. To fix this click on the LSK next to the second waypoint b (b will now appear in the scratchpad), then click on the LSK next to the first b, this will connect the part of the route starting from the second b to the part of the route before the first b and eliminate the waypoints in between.
You can interpret this functionality as a sort of “drag and drop” in the route, you drag a waypoint up...
Often ATC will tell you skip one or more waypoints and send you directly to one of the following ones, in the same way using the procedure above you can “drag and drop” to cut out the part of the route as required.
ATC might possibly give you a custom waypoint, like 10 miles northeast of SWL, this is entered in the FMC using a BRG/DIST string, in this example that would be “SWL045/10” meaning 10 miles from SWL in a 045 degrees direction.
In the same manner you might want to enter a custom waypoint that is on the intersection of 2 waypoints, “SWL045/MAFAF120” will create a custom waypoint on the intersecting radials 045 degrees and 120 degrees from waypoints SWL and MAFAF.
Waypoints can be entered as coordinate strings and one function that exists in iFMS which is not standard Boeing functionality is that when you tap anywhere on the NAV display, the coordinates for that position appear in the scratchpad. This way you don’t have to type the whole string which makes things a bit easier for the PIC.
Of course If you want to keep things as realistic as possible, just don’t use this function and type in the coordinates manually.
One more route programming tip, when you make modifications to your existing route you will see “<ERASE” appear next to LSK6. This allows you to undo your changes and go back to the route as it was when last executed. Of course once you execute your changes this option disappears.
|